Two weeks ago, I accidentally drop my Wacom Pen. It happened several times before but this time, the pen stop working 🙁 The tablet could not detect the pen tip but the eraser tip was still working.
It’s an old model which I bought on 2002 (Wacom Graphire 2) and the replacement pen cost around 40 Euro 😯
Now I am using a mouse.
Three years ago, I decided to stop using computer mouse and rely 100% on my Tablet. Actually, I was training my eye-hand coordination using the tablet. I found it’s more natural to use a pen so since then, I stick with it. It’s also good for your wrist since I read somewhere that you could reduce the risk of getting Carpal Tunnel.
I plan to buy a new tablet later (maybe the Wacom Bamboo) so it’s worth it to try repairing the pen 😛
Click more to see my step-by-step instruction (with photos) how to fix a broken Wacom Pen 🙄
Disassembling the Pen
Just pull the part which has erase tip on it. Do not twist it coz the pen will break. If your hand is sweating you can try to use rubber glove for a better grip.
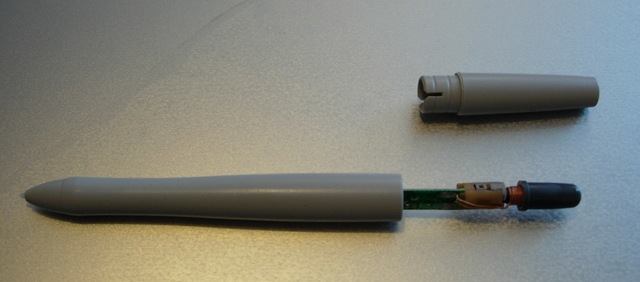
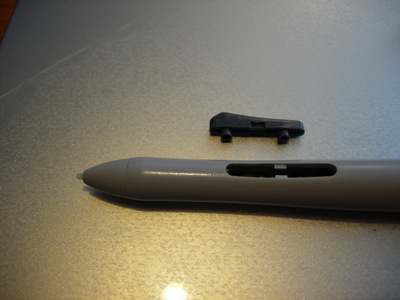
In order to pull out the electronic board, you have to take off the pen buttons. Just carefully use a screwdriver to peel off the button.
Now pull the board slowly and put it on a safe place. The electronic part looks fragile so you might have to handle it with care.
Fixing the Broken Black-Iron-Thingy
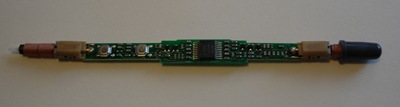
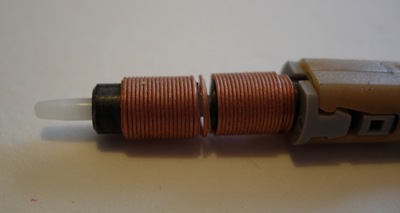
As you can see from the photo below, the black iron near the pen tip is broken. This fragile part is easily broken if you drop the pen. Luckily, I found on the Internet that someone has successfully super-glued that part and the pen works 🙂
Super Glue Saves the Day
Unplug the pen tip (the pointy white plastic part) before you superglue the iron part. Just put a few drops on the crack and push the iron thing with your thumb so the crack is close together. Hold that position for 40 seconds until the glue is dry. (Note: Please be careful with the glue. Later in this post, you will know that I’ve messed up the glue)

Is It Working?
After I put all parts together, I tested my Wacom Tablet. It worked :)) !!! The cursor moved responding to my pen tip position.
However, when the pen tip touch the tablet surface, the tablet failed to detect a mouse click.
There was still a problem with the pen tip 😕
When I unassembled the pen, I realized that the pen tip plastic part was accidentally glued to the iron part. I think, the glue wasn’t dry enough when I put the pen tip back. The result, the pen tip was glued to the iron part and get stuck. The pen tip cannot detect the pen pressure since it cannot move anymore 🙁
Lessons of the Day
- Be careful when gluing the broken part. Make sure you are not gluing unnecessary parts 🙄
- If you rarely use the erase tip (like me), have a lot of time and soldering skills, you might try to unsolder the erase tip part (including the black iron part) and solder it back to the pen tip side. It seems that the iron parts from pen and eraser tip are the same. Maybe they’re interchangeable?
- Never drop your Wacom pen 😛
Update (May 2009): I add a new post about soldering the erase part to the front , replacing the pen part.
Hey Wolfie! I have the same tablet as u. I had the same problem getting the end piece off as well. I finally got it off with a pair of pliers. it takes a while but i got it open after a few minutes. But rap the pen up with a shirt because it will scratch the crap out of the pen.
P.s thanks for the Blog Abiyasa! I don’t think i would have tried to fix my pen if I hadn’t found it.
The Black Iron Thing Was Broken On Mine Too But The Wire Had Gotten All Weird And Stuff cause i did it wrong D; and now i have to buy a new pen T,T…….
I had the same problem, followed your tut and everything is OK now! Thanks man, i have a lot of work in progress!!!
Oh my pen not stopped working, but can’t stop clicking, not recognize click, only pressure. Eraser it’s ok, that solution solve my problem?
HOLY SHHHHH
we have the exact same problem and I tried using the *naked* tablet while holding together the black metal part and it worked!!! I’ma just have to put some super glue on when I go out later. XD
Trying out this fix-it now. Took about 20mins to take off the pen body parts apart. No broken black iron or internal wires, thankfully, but I need to get something off that is stuck inside the pen tip chamber. Wish me luck with putting it all back together and making it work. Cheers – /K
can u just pull the pen apart without taking off the button cus im having a hard time getting the buttons of bc i cant find a screw driver. x.x
I also have the CTE-450, and had the exact same problem (broken black thingy.) I went with the soldering, which worked beautifully. The trick with the CTE-450 is that the little gray part above the buttons is holding it together, so you have to pry it off first (which I didn’t know, so I ended up breaking a little peice off with a knife).
Thanks so much for these instructions!
Did similar with mine pen (CTH-461 and CTH-661 model). Had to use knife to loosen a little bit the grab and detach two main gray elements. Then I didn’t glue the broken part but instead inserted a small rubber ring into the pen so that there would be a pressure on the broken element and it connects again with the other one. Had some problems with ‘no clicking problem’ but tried multiple times to find a position (with the rubber) in which pen tip moves smoothly. And it works! 2hours work time
Cheers, Man! I just tryed it, and it looks like it will work! Thanks a million!
ANd it does work! Perfectly!
Thanks man!
And I promise I will never let it drop again!
🙂
My problem is that one of the wires has been severed completely. how do I fix that?
HA! This is great! Thank you sooo much. It almost fixed my problem, however, unlike all your nice friends, I THREW mine against the wall. (I thought I had lost all my layers in a complicated drawing!) I raged. I tried the repair and the stylus ALMOST worked … it kept jumping around the monitor. Something small and movable must also be broken. But I certainly appreciate your help. Thanks again.
This post gave me the confidence to pull apart my Intuos2 pen, solder back the wires and save myself €110. Okay, i basically had to snap the pen in 2, the Intuos pen doesn’t have two handy push-together parts – but the electronics are remarkably similar.
Thanks again.
I linked to this blog from my website. I made a tutorial also. Important things to add to your howto:
1) Once the iron core (black thing) is snapped, it will never absorb the electromagnetic waves with as much efficiency as before. In other words, the working distance of the pen from the tablet will decrease, regardless of whether or not the superglue job is done well.
2) Another option is to desolder the eraser coil and the tip coil and switch them. You can still fix the coil, but use it in the eraser which (in my case) is almost never used. It’s more normal to expect a smaller distance when erasing than when you’re writing. The decreased distance is not that noticeable if you use absolute positioning. With relative positioning, however, it becomes very annoying.
Okay, I’ve followed the easy steps.. but thing the is… the pen parts will NOT separate to where I completely see the motherboard!! 🙁 I mean, I can not take that one bit apart to go any further!! Any help there? 🙁
Thank you sooo much!!!. It fixed my problem
after fixing my pen TWICE thanks to your helpful info, i found myself unable for the third time. then i made the amazing discovery that if you simply set eraser to “click” instead of its default “erase” status, the eraser works just like a pen.
Thanks!
Zoe
Thanks for this post. It absolutely saved my Intuos4 pen. When my pen suddenly quit (the eraser worked) I looked all over the web for answers. Strangely, Wacom doesn’t offer *any* help. You gave the the courage to tug (hard) on my pen and it came apart. Inside I found one of the wires had become disconnected from its solder connection. I re-soldered it, put it all back together and, voila! It works.
Eek I washed my pen in my trac suit- took it apart rubber gloves and all had it was an old purple one Was difficult to separate- snapped the motherboard in half – so upset have work to do – would the water have riuined it anyway?
Depressed
Great, I switched the coils and works perfectly.
Thank you very much
Hey guys ) But how to disassemble New Pens for Bamboo? God ive tried it except smashig it with a hammer )
Any ideas? Please )
first I tried the gluing method… it worked but the cursor skipped and jumped at certain times.
then i tried the soldering method… quite worried at first as i didn’t dare do it. But after i did it, IT WORKS AGAIN! i mean like nothing happened to it.
just becareful not to make the solder to thick or else you can’t put it back in. i had to remove some after i realized it was too tight.
I never used the Eraser any way so thank goodness for that.
I’ve just fixed mine. Instead of putting the superglue directly on it, I used a toothpick to put it exactly where I wanted it in the right quantity. It worked like a charm 🙂
just fixed mine. I had problems with oversensitivity. It responded (clicked) when i came close. I pulled of the smalle plastic grey top on intuos 2 (if you pull hard at the back holding the front it will come lose and the print plate is access, for once getting mad worked for me;) ) i pulled of the grey top from the yellow case. And switch the small parts inside. (i lost some looking on the ground for 10 min. Look out there really really small and lookout you dont loose the feathers in the back. Now the eraser doesnt work anymore but the tip works!! yahoo!! great!
Excellent! I just dropped my pen and it stopped working. Five minutes later, having found this on Google, it’s working again. Thanks a lot for this little tutorial!
hey, my bamboo fun pen broke some time ago. As with the others’ problems mine is sensitivity; it gets clicked when I get it near my tablet(both tip and eraser). I tried opening it with the tutorial above but I didn’t see anything broken inside. Is there something I missed? Please help, thanks. 🙂
Thanks Dude!, i was going out of my mind! this is the second pen i break! i thought there was a problem with my graphire. (i am using a bamboo pen, by the way)
just a quick tip, i took some electrician’s tape and wraped the eraser part of the shaft (not the eraser) 5 or 6 times, then, using a pair of plyers i managed to pull open the pen without scratching the plastic. (you will tear 3 or 4 layers of tape, that’s what it’s for).
your tip works like a charm!! didn’t loose sensitivity!
BTW, you should get this tutorial into instructables.com , so worth it!
I found my bamboo fun tablet pen in the washer, apparently, it was in one of my pants and it was thrown in there. I tried it on my tablet, and neither nib or eraser would work. I took it apart and it felt a little wet in its computer. I put it under a lamp so that would vaporise. Do you think this will work?
thanks for this, my broken pen is as good as new 🙂
Can u help me? the tablet doesn’t detect the pen tip nor the eraser ): im a cluts so im not sure about taking off the eraser part and using super glue and screwdrivers and all that stuff. BTW i just got my tablet last week, and i drop the pen A LOT.
how exacly do i pull off the erase tip? cause i feel that if i pull to hard it will brake , or do i have to pull strong or something? O.O i dont nknwo im afraid of braking it
This is how i disassembled my now useless Bamboo Fun pen (MTE-450).
I did not find any broken coil and the old Graphire pen becomes the substitute.
Thank you so much for this. This Friday I’m presenting a live demonstration of my digital drawing (projecting it on to the side of a building too) and my pen dropped and decided to act up. With the time so close and replacement pen being sold out the only place I could find them, I have no way of getting a new one in time. But I looked into this and now it works like new. You have no idea how grateful I am!
Ok, for all of you that did that and not yet been able to fix their pen, i ve got the solution ( at least worked for me )
When you disassemble the pen u can see on the pcb( circuit board ) near the button there are 3 circular screw with flat head screws, they re not screw but potentiometers, use a screwdrive with the correct head, and turn them to the left slightly ( near 9 o clock ), it ll pass more juice from the magnet to the circuit board. My pen was non responsive, and jerkyness etc, i ve done that tweaked those 3 potentiometers to the right spot and combinaison and now have a perfectly working pen !!
Did that after switching the coil and magnet from eraser and pen, dunno if it works without doing it, certainly because switching the side haven’t got my problem solved.
hope it helps anybody !
Jey.
I just switched the eraser coil with the broken nib coil and it worked.
You were right! I’ve just adjusted the two potentiometers that are near to the tip turning them to the left (anti-clockwise) less than 90º and it works now! Thanks!
Here is a post I just bloged to another one on the same subject;
“I did find something very helpful I think but a warning: at your own risk. :]
The hardness part (at first) was indeed trying to pull out the top near the eraser and like you guys I didn’t want to leave marks if possible or even break anything.
What I’ve just tried is using a heat gun just below that top piece. I could send a you photos to be clear. The thing with plastic when heated up is it will expand slightly before losing its form or burning. So you heard me well, be careful on this one too! … but after a few turns around it with the heat gun (set to high) it slid right of as if it was in butter. I almost snapped off the eraser’s wire cause I had too much pull not knowing it would come off this easy etc.
So heat it up a few seconds, try pull it out gently so as not to break loose that wire. Increase the heat time if it does not come out yet. Again I could send you a photo or two to show you the best and safe way to position my fingers so it comes out strait and slowly.”
And here is the link to the full blog (not mine)
http://calchan.com/?p=704
Wow nice! The disassemblage helped me the most; not the coil was broken, but one of the coil ends wasn’t soldered well enough to the motherboard. The eraser worked but the tip didn’t. I resoldered the coil wire to the motherboard and now it works fine again! I had to use a kids’ plastic microscope to check wether the tiny wire was in place or not. Thanks!
Thanks so much for this informative post! I was on my second pen, when while in the middle of work, the tip suddenly stopped working (the eraser was fine). I called Wacom support and the only reply I got was to buy a replacement pen. Good thing I saw this! Turns out the contact point broke off. Easily repairable with some soldering. You saved me $40 and this new piece of knowledge is priceless! I’m off to find my first broken pen, perhaps I can fix that too! 😀
The magnets actually ARE interchangeable. I did switch them (because the tip part was not fixable) and it worked fine. 😉 I had my electrician friend doing the soldering work, of course.
I have the newer pen. It wont work. I tried getting the pen open but I can’t seem to get a grip on it. I got my dad to try and he couldn’t either….any suggestions? I need it working soon. I have some projects I have to do that im being paid for and I need to finish them in the next few days. PLEASE HELP!
Yeah an other one that works!!! thanks!!
Hey, thanks very much for this. I was trying to figure out how to open it (rubber gloves came in handy). Mine just needs a wire soldering to get the eraser working again 😀
I have a black pen from a Bamboo Fun. The buttons came out all right in the end but it took brute force to separate the two pen barrel halves. The stylus end core was broken and by the time I got the glue in the coil had begun to unravel and the whole thing was unrecoverable. I swapped in the eraser core, soldering carefully with a low wattage soldering iron, and now the stylus works like a charm. The eraser is lost for now but I’ll see if I can shake a replacement core (maybe a few) out of Wacom. Thanks for the excellent post and good luck.
this was JUST what i needed. button and eraser worked but the stylus stopped, and sure enough it was the crack. some glue and we are up and running again, and GREAT to know the other end can be used as a back up, etc! THANKS!
Pingback: Fixing A Broken Wacom: Soldering | Abiyasa Blogs
😀 This is awesome, I had tought time thinking how I can get my pen open, because the touch pen part didn’t come out how it should, Yeah it’s possible to ‘kill’ your pen
I bought the Wacom Bamboo Pen to aide me with my studies. I am currently a student and primarily use Microsoft OneNote to help in my notetaking. This is the most convenient for me as most of my professors utilize Microsoft PowerPoint for their lecture slides. I needed a tablet to use with my Windows 7 PC and laptop to further improve my ability to take notes and work out practice problems electronically.
When it came to installation, it was plug and play for the most part. I am running Windows 7 which comes with Tablet PC components by default. The only additional software needed was the Wacom Pen Tablet Properties software. The software allows a great deal of customization including handedness, pen vs. mouse mode, and many others.
When it comes to usage, it works as expected. Utilizing a tablet can be difficult at first like learning all new things, but I started noticing my dexterity improve over time. As stated previously, I mostly use it for notetaking and working out problems and it serves its purpose well. The only gripe I have is that it is sometimes easy to accidentally hit the side buttons on the pen as they are really soft and easy to push, but I changed the way I hold the pen to compensate for that.
Now as far as reliability, I have noticed the pen has started to malfunction. I bought the pen on 11/28/09 and the pen started malfunctioning on approximately 12/5/2009. After a restart, the Pen Tablet Properties software will not load at all. This makes the whole tablet completely functionless and unable to respond to taps. When I check Device and Printers in the control panel, there are no problems detected with the tablet. The only way to resolve the issue is to reinstall the driver, which is a pain because it must be done after every restart. I have posted on the Wacom EU support forums and searched for solutions but have not come up with anything satisfactoy as of yet. I am contemplating returning the Bamboo Pen before it is too late to do so and just saving up for a better (albeit more expensive) tablet.
Update on 12/13/2009:
I may have found a fix to the issue. What I did was unplug the tablet, uninstall the Pen tablet properties software, and remove the tablet from ‘Devices’ in control panel. I then reinstalled the Pen tablet properties software first, and then plugged back in the tablet. It may be crucial to install the software prior to plugging in the tablet so that Windows 7 installs Wacom’s drivers instead of the ones that come preinstalled. The tablet appears to be working as it should now. I will keep Amazon informed about any new issues that may arise with the tablet.
Updated score: 3.5/5
glad to hear you all fixed your pens (mostly), great information, thanks for sharing.
So, my question is, has anyone taken apart a pen from the Intuos 3 ?
I can see how to do it. Except maybe pull off the “eraser” and bring it all out that side?
Do I really have to saw it in half?
What a scam, wacom, shame on you.
Whoa! Thanks a ton! The glue helped. Works perfectly.
I’m so happy right now 😀
I live in Uruguay, and here the replacement for the pen costs around 60 dollars :@
I have a CTE-450 and your instructions worked perfectly (with the extra trick of prying up the little plastic part next to the buttons, and then pulling it in the direction of the buttons).
Thanks! 🙂
S.
Pingback: The Pen That Almost Died | Chasing Clouds
thanks so much for posting this! it saved me time and money… my problem was that the whole part at the bottom had disconnected by the wires. I took it to a guy who had a good soldering iron and now it works like new! thanks again!