Two weeks ago, I accidentally drop my Wacom Pen. It happened several times before but this time, the pen stop working 🙁 The tablet could not detect the pen tip but the eraser tip was still working.
It’s an old model which I bought on 2002 (Wacom Graphire 2) and the replacement pen cost around 40 Euro 😯
Now I am using a mouse.
Three years ago, I decided to stop using computer mouse and rely 100% on my Tablet. Actually, I was training my eye-hand coordination using the tablet. I found it’s more natural to use a pen so since then, I stick with it. It’s also good for your wrist since I read somewhere that you could reduce the risk of getting Carpal Tunnel.
I plan to buy a new tablet later (maybe the Wacom Bamboo) so it’s worth it to try repairing the pen 😛
Click more to see my step-by-step instruction (with photos) how to fix a broken Wacom Pen 🙄
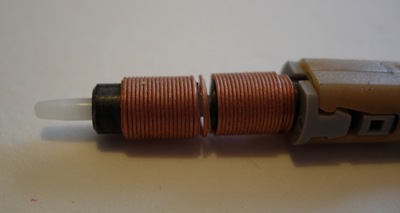
Disassembling the Pen
Just pull the part which has erase tip on it. Do not twist it coz the pen will break. If your hand is sweating you can try to use rubber glove for a better grip.
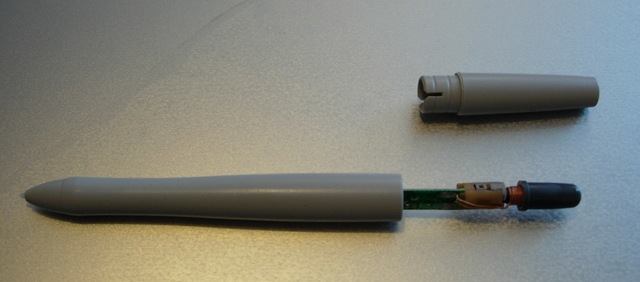
In order to pull out the electronic board, you have to take off the pen buttons. Just carefully use a screwdriver to peel off the button.
Now pull the board slowly and put it on a safe place. The electronic part looks fragile so you might have to handle it with care.
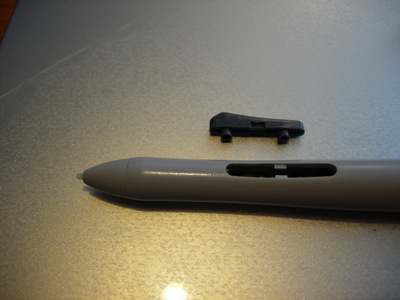
Fixing the Broken Black-Iron-Thingy
As you can see from the photo below, the black iron near the pen tip is broken. This fragile part is easily broken if you drop the pen. Luckily, I found on the Internet that someone has successfully super-glued that part and the pen works 🙂
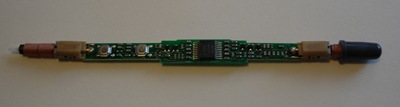
Super Glue Saves the Day
Unplug the pen tip (the pointy white plastic part) before you superglue the iron part. Just put a few drops on the crack and push the iron thing with your thumb so the crack is close together. Hold that position for 40 seconds until the glue is dry. (Note: Please be careful with the glue. Later in this post, you will know that I’ve messed up the glue)

Is It Working?
After I put all parts together, I tested my Wacom Tablet. It worked :)) !!! The cursor moved responding to my pen tip position.
However, when the pen tip touch the tablet surface, the tablet failed to detect a mouse click.
There was still a problem with the pen tip 😕
When I unassembled the pen, I realized that the pen tip plastic part was accidentally glued to the iron part. I think, the glue wasn’t dry enough when I put the pen tip back. The result, the pen tip was glued to the iron part and get stuck. The pen tip cannot detect the pen pressure since it cannot move anymore 🙁
Lessons of the Day
- Be careful when gluing the broken part. Make sure you are not gluing unnecessary parts 🙄
- If you rarely use the erase tip (like me), have a lot of time and soldering skills, you might try to unsolder the erase tip part (including the black iron part) and solder it back to the pen tip side. It seems that the iron parts from pen and eraser tip are the same. Maybe they’re interchangeable?
- Never drop your Wacom pen 😛
Update (May 2009): I add a new post about soldering the erase part to the front , replacing the pen part.
Same thing here, it’s a bamboo, but the internals are exactly the same. What I think explains why the eraser bit never seem to break is because it’s attatched to a rubber part that acts like a damping system or suspension. The cylinder on the tip, on the other hand, is attatched in a solid bracket, which doesn’t do any damping, and transmits the shock of the fall directly to the cylinder. We might question Wacom about their choice of desing…
Great post. Mine was the solder from the little wires that connect to the coil. Re soldered and it works good as new. The tip about wrapping with a rubber band was also good stuff. I couldn’t get mine apart until I did that.
Hi.
Many thanks for this tutorial.
I have (almost) repaired my broken Bamboo Fun pencil.
I have one suggestion. When you have to glue the iron part, you should first put it outside of the plastic base (be careful to not broke the wires). Then you could work better and avoid what happened to me: the excess of glue felt to the plastic base and leave the small preasure button unusable. So now I have a pen that detects movement but unable to draw 🙁
Thanks a lot! Thanks to you I managed to repair mine!
ohh, i cant open my pen, its a baboo pen,(not the fun bamboo) just the black one…. i need to use the pen, any help ?
Hi, thank you all for your comments. I was able to fix someonelse´s bamboo fun pen.
My experience: you first have to open the bottom part of that little grey (or blue) thing above the buttons, it has a lock that will stop the pen from being opened. Once that is done, you can slide down the grey thing to take it off or you can leave it there. Then you call two or three bodybuilders to help you take both parts apart. the button may or may not be removed, but it is adviceable.
Holy crap!!
This guide is just amazing.
Thank you very very much Abiyasa.
** And Dental Floss is the MASTER technique!!!! Thanks Kjetil Birkeland Moe
Pingback: Fixing A Broken Wacom: Soldering - Abiyasa Blogs
Hi there, just a little update with my experience. The guy whose pen I fixed complained about the sensitivity after the gluing. Before he could lift the pen and it would work. Now he has to keep it close to the tablet. So I changed the eraser with the tip (with some soldering) and it seems to work now like before. The eraser still works well too. A note about the soldering is to keep it as small as the original. The thing is really tight and any bigger bump and the pen will not close back again.
thanks a lot bro, i just swapped the magnet from the eraser with the broken front one, works like a charm now, who needs a eraser anyway ?! 😛
OMG, thanks so much dear! Yours was the best solution of them all. I risked the 50% chance of damaging the chip since I was already irritated that it’s been months since I last used it since only the eraser is working. And it WORKED! 😀 I have a Bamboo Fun btw. 🙂 but still the same. all my thanks to you. 🙂
thank you very much for this post. pen fixed!
Nice tutorial.. it helped me a lot!! Thank you Abiyasa!!! 😀
Thank you so much! I have a Bamboo Fun and it was really, REALLY hard to disassemble the pen, but after that, it was easy and now my pen is working again! 😀
i can’t get my electric board out and when i tugged A little this cord came out so now my whole pen is broke 🙁 and im on my second pen 🙁
lmao I dropped it the same day I got it 🙁
ps. Use mouth
Thanks er…, idiot, but I think you might lost your teeth if you do that
wow, great tutorial, you saved me however much a bamboo fun pen costs!!
by the way for anyone with a bamboo fun tablet, having this problem with their pen, everything is the same as in this tutorial, but be warned taking the pen apart is a but different
i just pulled and pulled and broke a little snap.
you have the button, take an exacto knife and pry from the side of it, it pop’s out very easy. the other blue surface ( or whatever color it is for you) that looks like a continuation of the button pry from the same spot, it bends without breaking, so apply as much pressure as you need. lift directly off the pen from the middle.
the rest is gravy
after reading, prying the blue things were easy. i couldn’t pull the pen apart and had to wiggle a small chisel thing to separate. everything works fine except the middle bit where the pen joins is uneven and ugly. i don’t think i could have done it with the dental floss. even putting it back needed a lot of pressure. ugly BUT it WORKS. maybe someone can try applying a little warmth to soften the plastic.
http://wishidknownthat.blogspot.com/2009/04/fixing-wacom-bamboo-pen.html has photos for the Bamboo Fun.
The site “I found a brilliant blog at http://abiamy.com/abiyasablogs/200…”
I really appreciate this tutorial… I owe you one dude …. thanks 🙂
Great Work abiyasa (you might consider adding this Tip as an update to your post because some people might not read all the comments before attempting this repair)
I have never taken one of these pens apart but I have taken apart many plastic assemblies and it is certain that if you warm up your pen, with a hair dryer or something like that, it will require less force to separate those parts. Do not hold the pen to close to the hair dryer, you want to warm it slowly and not just heat the surface. Do not warm it too much if it is too hot to hold it is too hot.
I hope this helps, work safely, remember always wear safety glasses and do not put things in your mouth.
Don’t lose your grip!
Best of Days
Bill
I followed this guide, Step by step, for my Bamboo pen, which has the exact same design as yours, but it didn’t work. I fear I didn’t glue the coils close enough or something. I wasn’t sure whether I should be gluing the black part or the coil part, or both. The black part is stuck together pretty well, but there is a tiny crack between the coils. Now the glue is dry and I don’t know what to do. Is it too late? I won’t have $40 to get a new pen for a long time.
this has nothing to do with it since i kno this could happen than im sure i will keep a tigght grip XD
but where do they sell the refill nibs though? …-_-…
i just bought it yesterday, and now its already wasted i think, but i dont want to use th eother three that came with the product.
HELLO TO ALL OF YOU. JUST THE SAME USER, JUST THE SAME PROBLEM WITH MY FUN PEN / MODEL CTE 650. THANK YOU VERY MUCH FOR ALL THE WONDERFUL DIRECTIONS……
I MADE ALL THE STEPS ABOVE, BUT FINALLY MY PEN IT DIDN’T WORK. QUESTION: I DIDN’T USE EXACTLY THE SUPERGLUE (THE SAME) INFORMED, BUT ANOTHER COMMON AVAILABLE GLUE. IS THIS THE PROBLEM? ONLY THIS SUPERGLUE FIXES THE PROBLEM?
WAITING FOR YOUR KIND REPLY…..
WARMEST REGARDS TO EVERYONE,
FANIS.
Great work, Abiyasa! Thanks to this tutorial, my boyfriend could fix my Wacom Bamboo pen. Dental floss helped to disassemble the pen; he used Loctite’s Super Glue (the liquid one, not gel) and avoided excess of glue by dropping some in a paper and using the tip of a needle to glue the broken ferrite core. My pen works agains! *_*
thanks for the tips!
i got my pen fixed, but there’s something wrong about it..when i place the pen on top of the tablet (without touching it) the cursor is not moving, but when i touch the tablet with the pen, it is responding normally..(wierd)
any help will be appreciated!
thanks again!
@ FANIS
Im also using bamboo fun and i followed the steps and it worked…..the glue brand doesn’t matter i guess 😀
This tutorial spelled out exactly how to fix my pen that I dropped. Thanks!
Gluing the coil back together did decrease sensitivity a bit, but by gently pulling/pushing the nib, I was able to get most of it back.
This post is amazing. My pen was only working on one side. I just bought this wacom after christmas this last year (08). I have my computer in a room that has a tile floor. The pen has been dropped a few times for sure. My first thoughts were diodes broken from the circuit board. I was able to pull it apart (quite easily) and glue the ferrite core back together and it is working like new. Thanks for your post.
Jeremy,
THANK YOU so much for the detailed instructions on how to do this. I dropped my pen this morning and the tip quit working. I’m already on my second pen after spilling coffee on my first, so I did not want to have to order yet another replacement. This fix worked like a charm! I’m not a handy person at all, but I followed along and was successful. The only issue I ran into was that when I was trying to put the parts back together, I didn’t get everything lined up exactly right and got it stuck for a while. Fortunately, I was able to get it straightened out and back together. Thanks again!
Great stuff. I actually work on bamboo, but fixed it the same way, thought it is not as sensitive as it used to be. I think I’ll move magnet from eraser – that should fix the problem.
Great job. I saved days of waiting and 30 quid!
Thx for post. I had bamboo pen broken… I didn’t have super glue near… so I’ve successefully unsoldered part from eraser and soldered back to another side… it works!
disassembling bamboo pen not so straight but easy enough… first remove both blue buttons then slowly but firmly start pull two parts.
Well, thanks for the instructions, I managed to glue the ferrite core, but it still doesn’t work… Ow heck, this morning I bought a cheap second hand tablet (almost the same) with a working pen :). Basically I now have 2 tablets and one pen 🙂
Greetz,
JP
thanx a lotttt … u just saved me 2500 rupees! dats 50 USD btw.
thanks for ur tips~
I dropped my pen in some coffee the other day (go me) and the pen hasn’t worked since. I have a bamboo MTE-450A. Do you guys think disassembling it will help?
I used an old guitar string to open it. Just wound it around the crack until it went in, then pulled with some pliers. 🙂
I dropped some kind of candy into my pen, thanks to this post I could disassemble the pen, and clean it. Thanks !!!
hi…. well… i finaly open it but when i glue it… the pen wasn´t fixed… and yes de pen was broken same as yours
what could happen??
i think that was bad idea putting the glue between the broken parts…
please respond
i would thank you all my life!!
P.S. is REALY dificult to open the pen!! xD
Thanks for your help. I had the same problem with my bamboo pen. 30€ for a new or 10 minutes time for repairing is a great deal.
Well, thats encouraging I guess. I pen is all messed up, I used it this morning and it worked fine but when I got it out after I came back it would not work :[ it takes great ammounts of pressure to make a click and the tablet is immune to my pen when it hovers. I dont know what to do anymore! I dont know what could have made it act that way!
I am soooooo thick!!!
i tried to pull of the bit at the end like ou said but by acident i pulled of the erasor and a coil has came out!
idk how to re wind it and as im only 12 i cant pull of the thing :p
im going to just buy a new one but ill kepp thisone aswell. in the meantime ill still try to fix it:] anyway thanx for the info, im sure it was helpfull to everyone else :s
soldering did the trick for me.
first tried to glue it, but performance was pretty bad. replacing the pen part with the eraser part was very easy.
dont laugh….
I dropped mine in the toilet! Anyone ever deal with a wet pen?
Repaired my pen using your suggestion of replacing and soldering the eraser part’s coil part with the pen tip’s coil and it worked perfectly!
Thanks for your expert Advice!
Note; For those who accidentally pulled off the coil, just solder the wires where it was cut and you’re back in business.
Thanks! Used to fix my wet pen!
MY PEN WAS STICKINGS, LIKE THE CLICKER WAS STUCK DOWN. SO I TOOK THE CLICKER OUT AND SEPERATED THE PEN HALF WAY, NOW IT SEEMS TO WORK FINE AGAIN.
WAIT ITS STILL HALF MESSED UP, ONLY DOESNT STICK ON MAXIMUM PEN PRESSURE STIFFNESS, AND THAT SUCKSSS
TRY INSTALLING THE NEWEST DRIVER OFF THEIR WEBSIGHT, IT AS SEEMED TO MAKE THE FIRM PRESURE MODE, NOT SEEM SO FIRM ANMORE. SEEMS ALL FIXED NOW.
I have a Wacom Bamboo Pen (not Bamboo Fun), and the bottom is ridiculously difficult to get off. I’ve tried everything I’ve read here, but nothing has worked. Any other tips?